Those who take my Gauge Master Class know that I believe in making swatches, blocking them as I intend to wash/dry the garment, and measuring stitch and row gauge before AND after blocking. This allows me to knit patterns with a gauge that differs slightly from the pattern recommendation, with the assurance that the end result will fit correctly. Currently, I am knitting a pattern by Elizabeth Doherty, Underwood. She has a very interesting method for knitting a set-in sleeve from the top down, that I want to try out. I showed you my blocked swatch in a previous post. My stitch gauge matched the pattern, and did not change with blocking. So, I’ve forgotten about that already, and haven’t made any changes to the pattern as far as the stitch number is concerned. My row gauge did change, however. Unblocked, I got 7 rows/in, and blocked was 8 rows/in. The pattern wants 8 rows/in.
In my classes, I suggest changing needle material in order to change a row gauge, as that will work for some knitters. For lots of patterns, row gauge isn’t critical, as it is easy to shorten or lengthen a sweater. However, for the Underwood pattern, the row gauge is something that can’t be taken for granted, because her calculations for picking up stitches around the armhole are based on the number of rows! Also, there is shaping for the body which takes place at certain spots below the bust and above the waistline. So, I’ve been doing some math to account for this. It’s really easy math. I just have to add ONE ROW for every inch of fabric. I mean, how much easier could that be? I just have to live with the unblocked garment looking too long until it is finished and blocked.
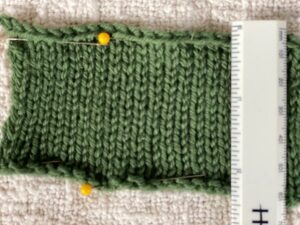
blocked Cloudborn Highland DK swatch row count: 8 rows/in (32 rows/4 in)
For the armhole, I knit the exact number of rows she indicated for my size. This makes the armhole look a bit deep now, but I know that it will snug up after it’s good long soak, and drying. I also keep in mind that in the worst case scenario I will just have a slighter deeper armhole than intended, which won’t ruin my day. So, I got to skip doing math for that part of the pattern. The waist shaping was another issue, though. Although it is subtle, and a bit of too high or low won’t be noticeable, if I don’t add rows in the body my sweater will be too short. The math is really easy, and I might as well build the shaping in properly.
Here is the math: I have 1 less row per inch than I should have, for her row gauge of 8 rows/in. So, for every inch of fabric, I am knitting one extra row. That is all there is to it!
Another way to calculate is to actually measure the rows knit, for 7 rows/in. Then calculate how many rows you need for 8 rows/in and knit to that number. This method is needed when you aren’t dealing with whole numbers. It’s a bit unusual to have one whole row difference, which is why I’ve been obsessively measuring to make sure that I’m not seeing what I want to see!
Example for this sweater: 18 in at 7 rows/in = 126 rows.
18 in at 8 rows/in = 144 rows
This also tells you to add 18 rows (144- 126 = 18).
This sweater pattern has a ton of shaping in it, so counting total rows isn’t as easy as with flat rectangular fabric. The shoulders are shaped with short rows, and the shaping just kept coming: neckline, armholes, bust, then waist. There is a lot going on, so it was just easier for me to put extra rows where there is plain knitting above and below the shaping.
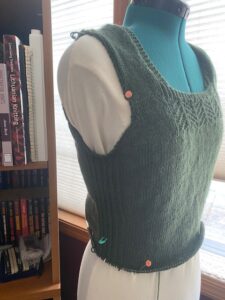
The piece should measure 18″ to the waist, for me. I have now knit 18 rows past my actual waist, to compensate for my unblocked row gauge. At this point, I’m going to start increasing for the hip, and you can see that I am a little low on the dress form for this step, because of my extra rows. When I am done with the body, the sweater will be slightly long. I have to ignore this and trust my swatch. After blocking, it should (WILL) be perfect. The final sweater length is supposed to be 22 in, so I need 3 more extra rows, total. I’m currently working the hip increases, and I plan to start the hem gansey chart after I have finished the “extra rows”, as I don’t want to alter the charted hem by adding rows. I’ll model the unblocked sweater, when I’m done, and I already know that it will look too long. Knowing that ahead of time is important, so I won’t panic! Of course, I continue to measure and re-measure the sweater in progress, and the blocked swatch. It is reassuring when I keep getting the same measurements, assuring me that I am on the right track.
As a double-check, before I bind off for the body, I plan to measure the total length of the sweater. 22 rows, worked at 7 rows/in. happens to calculate to 3.14 inches (Pi alert! That must be a good omen, right?) Since I want my blocked sweater to measure 22 inches long, the unblocked sweater should measure just over 25 in. long. If I am a bit short, I can add some ribbing. I prefer longer sweaters, so I am unlikely to rip out, if it runs a bit long.
Row gauge unblocked: 7 rows/in. The blue locking marker is at my waistline, and the garment measures 18 in. I have knit an additional 18 rows, because my blocked row gauge will be 8 rows/in. The needle is currently below my waistline, but that row is expected to move up to the waistline after blocking.
This is a really lovely pattern, Doherty’s instructions are clear and easy to follow. The knitting is interesting, but not complicated. I am enjoying knitting this sweater, very much.